
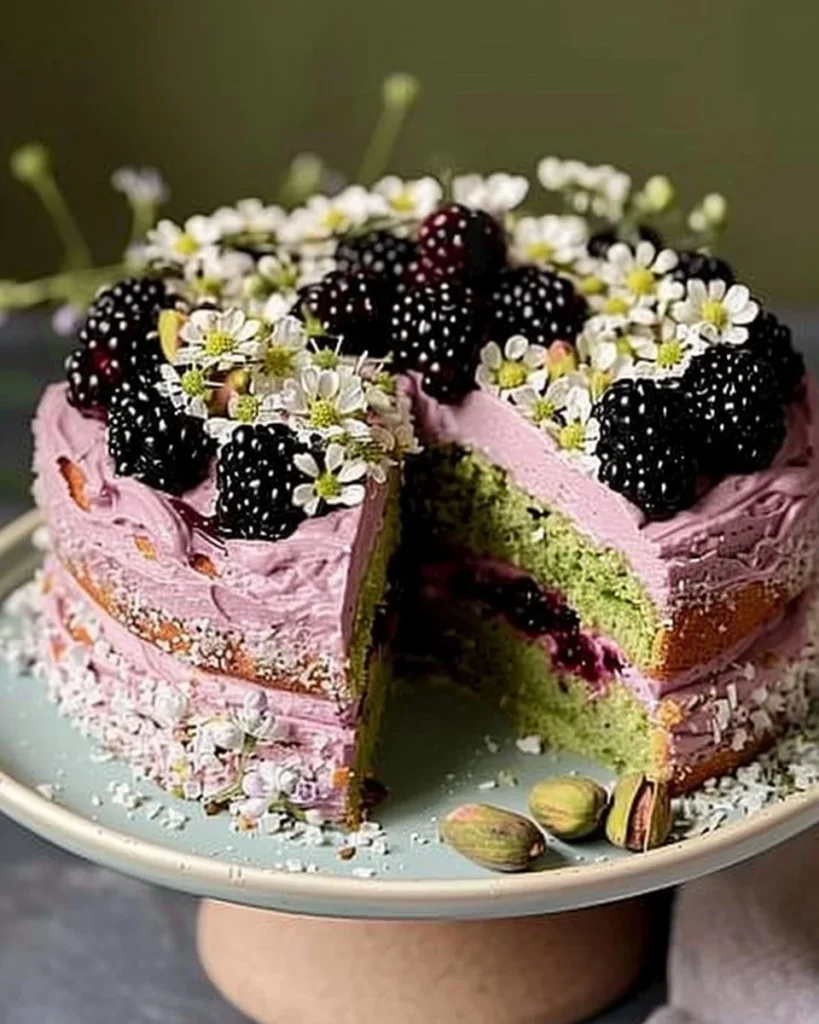
A Slice of Home: Pistachio Olive Oil Cake with Blackberry Thyme Buttercream
The Emotional Hook
The first time I attempted this cake, I had no idea what I was doing. It was a typical Sunday afternoon, and my daughter Chloe had convinced me we should bake something a bit more exciting than our usual chocolate chip cookies. I’m telling you, it’s like she knows how to get to my heart (and stomach!). With a kitchen that smelled like burnt almonds and a spatula somehow stuck to the wall—seriously, how does that happen?—I found myself sobbing into a pile of pistachio husks. My husband walked in, took one look at my flour-dusted face and said, “Don’t worry, this will be a great story someday.” And you know what? He was right!
Fast forward to now, and this Pistachio Olive Oil Cake is the very recipe I whip up to celebrate life’s little moments or soothe a soul in need (often mine!). Whether it’s a random Tuesday or a friend’s birthday, I’ve perfected it, and I can’t wait to share it with you—because trust me, this experience doesn’t require a baking degree, just a healthy appetite for life’s learned lessons.
Why This Matters
Everyone needs a cake that whispers “You’re loved” without being overly sweet. This Pistachio Olive Oil Cake isn’t just a treat; it’s a slice of comfort, a reminder to slow down, and a reason to gather around the table. Picture this: your friends and family seated, eyes lighting up as they take that first bite; happy smiles replacing any smartphone distractions. It’s what you bake when you need to impress without draining your wallet. Plus, the combination of olive oil and pistachios creates a rich, nutty flavour that dances in your mouth. You might even find yourself going back for seconds—and who would blame you?
Before You Start
- If you only have regular vegetable oil instead of high-quality olive oil, you’re still golden! But don’t skimp on the flavour; go for the best you can find for that extra wow factor.
- One tool I can’t live without for this cake is a good whisk (mine’s from a fancy shops but honestly, any whisk works). It makes mixing that much easier—and way more fun (hello, arm workout!)
- If your toddler decides this is the perfect time for a meltdown, just keep a batch of frozen berries nearby. They’re great for quick smoothies and will buy you some time as you regain your composure (and focus!).
- Pair this cake with a crisp white wine if you’re feeling fancy, or a nice cup of chamomile tea if you need something soothing.
The Ingredients
- 225g plain flour (I use whole wheat when I feel healthy, but good ol’ white works just as well)
- 150g granulated sugar (because life needs a bit of sweetness)
- 75g pistachios, shelled and roughly chopped (trust me, get the shelled ones—your nails will thank you later!)
- 3 large eggs (I usually buy free-range, because we can all use a little more happiness in our life)
- 150ml high-quality olive oil (I splurged on the spicy stuff from the local market; it adds such depth)
- 200ml milk (whatever you have—whole, almond, even oat milk if you’re feeling trendy)
- 1 tsp baking powder (a must for that lift!)
- 1/2 tsp salt (sea salt, because my grandma said so!)
For the Blackberry Thyme Buttercream:
- 115g unsalted butter, softened (do not use margarine unless you want to unleash my inner kitchen demon!)
- 200g icing sugar (I could honestly eat this by the spoonful, it’s that good)
- 100g blackberries (fresh preferably, but I won’t judge your frozen stash)
- 1/2 tsp fresh thyme leaves (the secret ingredient that tells people you’re a kitchen magician)
The Step-by-Step Instructions
Step 1: Preheat and Prepare
Turn your oven on to 170°C (150°C fan). While that warms up, grease and line an 8-inch round cake tin with baking paper. (Trust me on this, it prevents despair on cake-unveiling day!)
Why this step matters: Preheating ensures an even bake; otherwise, you’ll end up with a sad, lopsided cake (and we don’t want that).
Common mistake here: Not using enough butter on the sides of the pan. You’ll know it’s ready when it smells like a warm hug in your kitchen.
My personal hack: Use a little flour dust over the butter, too, for an even easier release. I learned that the hard way after my first cake got cosy with the tin and refused to budge—talk about a disaster!
Step 2: Dry Ingredients Unite
In a mixing bowl, whisk together the flour, baking powder, pistachios, and salt. (I like to call this the dry party—everyone gets to know each other before the wet ingredients crash the scene.)
Why this step matters: Integrating the dry ingredients helps even out the flavours and makes sure there are no clumps.
The sensory cue: You’ll know it’s perfect when everything looks like a lovely green and beige blend.
Step 3: Wet and Wild
In a separate bowl, whisk the eggs and sugar together until pale and fluffy (which, can we just agree, is a really satisfying sight!). Then, gradually mix in the olive oil and milk until combined.
Common mistake: Not whisking long enough—trust me, it makes a difference between a dense and airy cake.
I like to imagine little Chloe sitting next to me, arms crossed with the biggest puppy eyes, begging for a taste while we work our magic.
Step 4: Combine and Mix
Fold the dry ingredients into the wet gently. This isn’t about brute force; it’s about being tender. You’re creating a cake, not a batter monster!
Why this step matters: Over-mixing can ruin that lovely airy texture, and you’ll end up with a dense brick.
My personal hack: If you’re feeling fancy, throw in a splash of vanilla extract for that touch of luxury—nothing beats that aroma!
Step 5: Into the Tin
Pour the batter into the prepared cake tin, levelling it out with a spatula (and yes, that spatula is my constant kitchen companion).
The sensory cue: You’ll know it’s ready for the oven when it looks smooth and inviting.
Step 6: Bake Time
Pop it into the oven and bake for 45-50 minutes or until a skewer poked through the centre comes out clean. (I like to use the “10 more minutes” approach if it’s still a bit wobbly—the oven takes no prisoners.)
Common mistake: Peeking too early! Keep that oven door closed unless you want a cake that falls flatter than your last Zoom call.
Step 7: Making the Buttercream
While the cake cools, let’s whip up the buttercream. Beat that softened butter until creamy—don’t rush this part!
Why this step matters: This is where the magic happens, people! The better you beat, the fluffier your buttercream becomes.
If you’re multi-tasking: While you’re doing this, you can crush the blackberries into a juicy pulp. Add this along with the icing sugar and thyme to the butter, and keep mixing until silky smooth.
Step 8: Assemble the Layers
Once the cake is fully cooled, it’s time to slather that gorgeous buttercream all over the top and sides. Because honestly, there’s no such thing as too much buttercream!
The perfect side: Pair this with a simple fresh berry salad—light and fruity, it complements beautifully.
Troubleshooting Real Life
-
If you burn the bottom: Don’t throw it away! Just slice off the burnt bits and pretend it’s all good. (We don’t talk about the layer cake I accidentally scorched at my sister’s wedding!)
-
If you’re out of blackberries: Swap them with whatever berries you have on hand, even raspberries or strawberries will do the trick!
-
If things aren’t going according to plan (like a toddler emergency): Stop, breathe, and stroll over to your freezer stash. Sometimes, the ‘frozen pizza night’ rescue is dinner’s best friend.
-
If it’s just not working: Maybe it’s not your day; definitely don’t beat yourself up. Grab that takeout menu or pour a glass of wine (we’ve all been there!).
The Serving Story
I serve this cake on a pretty vintage plate I inherited from my grandmother—because, let’s be real, food looks ten times better on something beautiful. Seriously, the old lady was onto something!
Leftovers taste even better the next day as the flavours meld. My husband and kids argue over the last piece, and it’s honestly the best kind of battle to witness.
The "When I Make This" Story
I often find myself making this cake on lazy Sundays when I can’t decide between dessert and having a bit of a baking adventure. While it bakes, I might fold laundry or distract myself by binge-watching reruns of old sitcoms.
We usually gather outside (if the weather’s lovely) to enjoy our slices, relishing that blissful feeling of sweetness mingling with laughter and togetherness. The cleanup takes about 20 minutes, but honestly, it’s worth it for that sense of satisfaction and a happy kitchen.
The Conversational Close
This cake has been at many family gatherings and has seen me through countless ups and downs (yes, I’m talking about those late-night baking therapy sessions). It isn’t flawless, but it’s mine—and that makes it special.
I’d love to hear if you try making this! Tag me in your photos or share your thoughts—let’s make this a collective kitchen adventure. What’s your go-to comfort food? I’m still figuring mine out, but for now, it’s this Pistachio Olive Oil Cake. Because life, like cake, is best enjoyed slowly, one slice at a time.
And remember: bring your heart to the kitchen, and you’ll always create something beautiful. Happy baking! 🌿🍰
Pistachio Olive Oil Cake with Blackberry Thyme Buttercream
Ingredients
Method
- Preheat your oven to 170°C (150°C fan). Grease and line an 8-inch round cake tin with baking paper.
- In a mixing bowl, whisk together the flour, baking powder, pistachios, and salt.
- In a separate bowl, whisk the eggs and sugar together until pale and fluffy. Gradually mix in the olive oil and milk until combined.
- Fold the dry ingredients into the wet ingredients gently until just combined.
- Pour the batter into the prepared cake tin, leveling it out with a spatula.
- Bake in the oven for 45-50 minutes or until a skewer poked through the center comes out clean.
- While the cake cools, whip the softened butter until creamy.
- Crush the blackberries and mix with icing sugar and thyme into the butter until silky smooth.
- Once the cake is cooled, spread the blackberry thyme buttercream over the top and sides.