
Fudgy Chocolate Raspberry Cookies: The Sweet Mistake that Made My Day
The first time I ventured into the world of baking, it was a sweet disaster. I remember it vividly: a rainy afternoon in my cramped little kitchen (maybe I should’ve considered a bigger space before diving into desserts?). It was supposed to be a simple chocolate chip cookie recipe—how hard could it be? Well, I clearly misread it and ended up with a gooey mess that resembled pancake batter more than cookie dough. I stood there, hands sticky and flour covering my face like a sad, defeated ghost of cookie ambition. Just when I thought I’d never bake again, my daughter Ella strolled in, took one look at my devastation, and said with the kind of wisdom only a child can muster, “Mummy, it’s okay. Even your mistakes are sweet.”
That day marked the beginning of my baking journey, and oh, how far I’ve come since! Now, I whip up these fudgy chocolate raspberry cookies regularly. They’re not just cookies—they are a celebration of imperfection and joy, a little reminder that sometimes the best things in life come from our most disastrous attempts. Trust me on this; these cookies are like a hug for your taste buds.
Why This Matters
Okay, let’s be real. We all have those days when we desperately need a bit of sweetness. Maybe you’re feeling overwhelmed after a long week or just need a pick-me-up on a dreary autumn day. These fudge-laden morsels, bursting with the tart tang of raspberries, say “I love you” without the cheesiness, like a warm blanket on a cold night.
Imagine this: it’s a chilly Friday, all you want is to sink into your sofa with something deliciously gooey and chocolaty in hand. Or perhaps you’re looking to impress someone special without breaking the bank? These cookies fit the bill perfectly. They’re fancy enough for a date night but easy enough for a weeknight treat. And honestly? They’ve got a secret ingredient that’s just as comforting as your grandma’s hugs (I’m not going to spoil it, you’ll just have to read on).
Before You Start
Here are a few nuggets of wisdom I’ve gathered through sweet trial and error that’ll make your life easier:
- Ingredient swapping: If you only have frozen raspberries instead of fresh, go for it! They’ll work just fine; just toss them in slightly frozen.
- Essential tools: The one tool that makes mixing infinitely easier is an electric hand mixer (or a good old wooden spoon, but be ready for a workout!).
- Child chaos: If you’ve got kids around, I recommend handing them a bowl with dry ingredients to “help” while you do the messy parts (just make sure the flour’s not in their hair this time!).
- Wine pairing: Pour yourself a nice glass of red while you bake—trust me, it pairs wonderfully with the chocolate.
The Ingredients List with Personal Notes
Here’s what you’ll need for these delectable cookies:
- 1 cup unsalted butter, softened (I always use Lurpak; it makes everything feel luxurious)
- 1 cup brown sugar, packed (or “slightly heaped,” because can we really measure?)
- 1/2 cup granulated sugar (I make do with whatever’s on sale—sugar’s sugar)
- 2 large eggs (trust me, your cookies will thank you for those extra yolks)
- 1 tsp vanilla extract (I use Nielsen-Massey; the aroma just gets me every time)
- 1 1/2 cups all-purpose flour (a lifesaver in most of my baking catastrophes)
- 1/2 cup cocoa powder (Dutch-processed if you’ve got it, or regular for those of us who can’t be bothered)
- 1 tsp baking soda (please don’t skip this; it’s not just there for looks)
- 1/2 tsp salt (I prefer sea salt; it brings out the chocolate beautifully)
- 1 cup chocolate chips (use dark chocolate; life’s too short for mediocre chocolate)
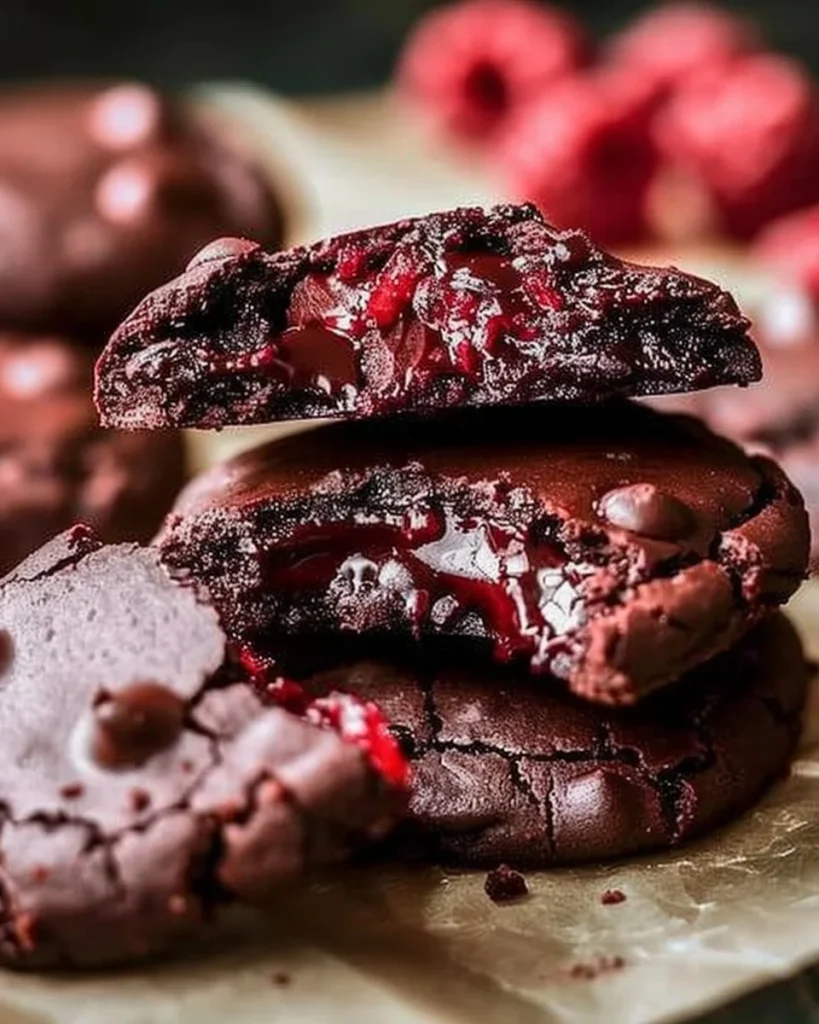
- 1 cup fresh raspberries (they add that beautiful burst of flavour and colour)
The Step-by-Step with Stories
Step 1: Preheat Your Oven
Practical Instruction: Preheat your oven to 350°F (175°C).
Why this step matters: Preheating ensures even baking. You don’t want one side of your cookies burnt while the other is gooey!
Common mistake here: Forgetting to preheat while you prepare your dough. Ain’t nobody got time for cold cookie dough waiting on the counter!
My personal hack: While the oven warms up, I take this time to tidy my kitchen. Helps keep my sanity intact (and my kitchen less chaotic).
Step 2: Mix the Butter and Sugars
Practical Instruction: In a bowl, cream together the softened butter, brown sugar, and granulated sugar until smooth.
The sensory cue: You’ll know it’s ready when the mixture is light and fluffy—about 3-5 minutes with a mixer.
Anecdote: This is where my daughter Ella always pops in demanding “Can I lick the spoon?” Spoiler: I always let her. Who can resist a spoonful of sugary goodness?
Step 3: Add the Eggs and Vanilla
Practical Instruction: Beat in the eggs, one at a time, then stir in the vanilla.
Why this step matters: Eggs help with the structure of the cookie, so don’t skip them.
Common mistake here: Cracking both eggs in at once! Take the time; it makes all the difference.
Anecdote: I once cracked an egg on my phone and nearly lost a functioning device. Now I always do this step over the sink!
Step 4: Combine The Dry Ingredients
Practical Instruction: In a separate bowl, whisk together flour, cocoa powder, baking soda, and salt until well blended.
Common mistake here: Mixing too aggressively can create lumps, and nobody wants that!
My personal hack: Use a sifter—if you’ve got one—otherwise, a fork does the trick just fine.
Step 5: Fold The Dry Mixture Into The Wet Mixture
Practical Instruction: Gradually mix the dry ingredients into the wet mixture.
Why this step matters: Stirring gently ensures that your cookies remain soft and chewy—nobody likes a flat cookie.
Anecdote: This is where I used to get overly excited and over-mix. I’m telling you, learning to embrace the gentle fold was life-changing.
Step 6: Add The Chocolate Chips and Raspberries
Practical Instruction: Stir in the chocolate chips and gently fold the raspberries into the dough.
Why this step matters: The chocolate and raspberries are the stars of this show. Take it slow; no one wants mushy raspberries in their cookies.
Anecdote: I once substituted the chocolate chips for chunks of chocolate I had left from a birthday cake, and it was chef’s kiss!
Step 7: Scoop And Bake
Practical Instruction: Using a cookie scoop, place rounded tablespoons of dough onto a lined baking sheet.
Common mistake here: Not leaving enough space in between cookies. They need room to spread!
The sensory cue: Bake for about 10-12 minutes or until the edges are firm but the centres still look soft and puffed.
Step 8: Cool Down and Devour
Practical Instruction: Let them cool on the baking sheet for a few minutes before transferring to a wire rack to cool completely.
Why this step matters: Patience pays off! The cookies may seem too soft but will firm up as they cool.
Anecdote: This is where my husband Mark usually wanders into the kitchen under the guise of “helping” but really is just fishing for a cookie.
Troubleshooting Real Life
- If you burn the bottom: Use a spatula to gently lift off the good parts (you’ll lose some, but don’t despair—chocolate never goes to waste!)
- If you’re out of raspberries: Trust me, chopped strawberries will also work fine but treat them gently so they don’t turn to mush.
- Need to pause for an emergency: If chaos strikes (like the phone ringing), simply cover the bowl and pop it in the fridge. Just avoid leaving it too long, or it will harden up.
The Serving Story
When I serve these cookies, I go all out—stacking them high on a lovely cake stand because it just feels special. I mean, who doesn’t feel fancy eating cookies on a stand, right? Sometimes they end up in paper napkins while we sit down in front of the TV for family movie night, but I like to pretend it’s all very posh.
And leftovers? They taste even better the next day (if they last that long!). This is where I admit: I often eat the crispy bits straight from the pan; it’s my guilty pleasure!
When I Make This
I usually whip up these cookies on a Sunday afternoon, when the leaves are turning and the weather’s grown crisp. While they bake, I’ll often fold the laundry (a necessary evil) or catch up with Ella on her latest school adventure. We eat these while nestled on the sofa—pants on, tea in hand—surrounded by blankets and each other’s stories.
The cleanup takes about fifteen minutes, but it honestly feels worth it.
The Conversational Close
This recipe has seen me through countless rainy days, and maybe even a few tantrums. It might not be perfect, but it’s mine—flour-coated disasters and all.
I’d love to hear if you make these fudgy delights—tag me on social media or enjoy them quietly while reliving my kitchen catastrophes. What’s your go-to comfort food? Mine changes, but right now, it’s definitely these chocolate raspberry dreams.
So grab your apron and let’s get baking!
Fudgy Chocolate Raspberry Cookies
Ingredients
Method
- Preheat your oven to 350°F (175°C).
- In a bowl, cream together the softened butter, brown sugar, and granulated sugar until smooth.
- Beat in the eggs, one at a time, then stir in the vanilla.
- In a separate bowl, whisk together flour, cocoa powder, baking soda, and salt until well blended.
- Gradually mix the dry ingredients into the wet mixture.
- Stir in the chocolate chips and gently fold the raspberries into the dough.
- Using a cookie scoop, place rounded tablespoons of dough onto a lined baking sheet.
- Bake for about 10-12 minutes or until the edges are firm but the centres still look soft and puffed.
- Let them cool on the baking sheet for a few minutes before transferring to a wire rack to cool completely.