Beef Yakiniku: A Delicious Journey from My Kitchen to Yours
The first time I tried to make Beef Yakiniku, I nearly burned my apartment down. Okay, maybe that’s a slight exaggeration, but you get my point. Picture me, a slightly frazzled home cook, frantically waving a towel around, smoke billowing from the pan, and all I wanted was a taste of the juicy, grilled goodness my friend Yuki had insisted I try. I had confidence—well, maybe more like a wild hair up my backside—thinking, "How hard can it be?" Spoiler alert: it turned out to be a comedy of errors. But here’s the kicker. That disaster led me to create a dish that’s now a go-to in my house whenever I want to impress (or simply stuff my face with something amazing).
Now, when life gets a bit crazy, and I’m tempted to order takeout, this Beef Yakiniku is my answer to the chaos. Trust me on this: it’s a meal that can turn heads and lift spirits, all while being accessible for home cooks at any level. So, grab your apron (or don’t, if that’s your vibe) and let’s walk through this delightful culinary adventure.
Why This Matters
Okay, let’s be real. We often reach for takeout menus when we’re short on time or energy. But Beef Yakiniku is where the magic happens. It’s versatile, delicious, and caters to all taste buds. Your picky eaters will learn to love veggies, and you’ll feel like a superstar chef—all without emptying your wallet. What’s not to love? This dish says, “I care about what’s on your plate” without being overly pretentious. It’s about comfort, connection, and creating a lovely meal that warms the soul.
Before You Start
Before we dive headfirst into those ingredients, here are a few nuggets of wisdom I’ve picked up along the way:
- Get your grill on: If you have a grill pan, use it! It’ll give your meat those gorgeous sear marks. If you’re stuck with an old skillet, don’t worry. It’ll still taste heavenly.
- Be flexible: Don’t have mirin? A splash of white wine or even a bit of sugar will do. Just don’t tell the purists!
- The secret nobody tells you: Prepare everything beforehand. I know, I know, it sounds a bit fussy, but trust me—it makes cooking more enjoyable. Imagine you’re at a ramen bar, and everything’s ready to go when your order hits the counter.
- Anticipate the chaos: If your kids start a tantrum mid-cooking, just know it happens. I’ve had to pause more meals than I can count, and guess what? The world didn’t end!
Ingredients for Beef Yakiniku
- 500g beef sirloin, thinly sliced (Go for whatever’s on sale; it’ll taste just fine!)
- 2 tablespoons soy sauce (I prefer Kikkoman—it’s my dependable companion in the kitchen)
- 1 tablespoon mirin (Trust me, it adds depth. But if you’re out, a splash of white wine works too)
- 1 tablespoon sake (It adds a lovely kick; feel free to add more if you’re fancy that way)
- 1 tablespoon sugar (You know, the stuff in the bag that you forget to use? You’ll need this)
- 2 tablespoons sesame oil (I’m telling you, this is key for that nutty taste)
- 1 bell pepper, sliced thinly (I like the crunch, but you do you)
- 1 onion, sliced (It’s about time we give onions the credit they deserve)
- 2 green onions (Chopped for garnish; they’re like sprinkles for your meal, right?)
- Optional: sesame seeds (If you have them, throw them on; they look fancy but cost pennies)

Step-by-Step Instructions
Step 1: Marinate the Beef
Practical Instruction:
In a bowl, combine the soy sauce, mirin, sake, sugar, and sesame oil. Mix it well, and then toss in that beautiful beef.
The Human Insight:
Why this step matters: Letting the beef marinate allows it to soak up all those fabulous flavours. It turns simple meat into something special.
Anecdote:
The first time I marinated beef, I did not know you’re supposed to do it in the fridge. I left it out overnight. Yup, what a rookie mistake. My husband just looked at me like I was a full-on madwoman. Now, I stick to marinating in the fridge and for no less than 30 minutes.
Step 2: Prep Your Ingredients
Practical Instruction:
While that beef is getting all flavourful, slice your bell pepper and onion. Get them nice and thin.
The Sensory Cue:
You’ll know you’re doing it right when your cutting board looks like a rainbow explosion. Seriously, vibrant colours make everything better.
The Human Insight:
Common mistake here: People forget to cut thinly. The key to quick cooking is thin slices. This means you’ll have beautifully cooked veggies—no mushiness here.
Step 3: Heat Your Pan
Practical Instruction:
Heat a pan over medium-high heat. Once it’s hot, add a splash more sesame oil.
Common Hack:
It’s amazing how an oil’s flavour can change the dish. I also use a little vegetable oil if I want to keep things balanced.
Anecdote:
I had a friend, Jen, who always used to say, “When it’s too hot to handle, it’s ready to go.” Now, every time I crank the heat, I hear her voice in my head.
Step 4: Cook the Beef
Practical Instruction:
Now add the marinated beef to the pan. Sear for about 2 minutes on each side, depending on thickness.
The Human Insight:
The secret here is that you want the beef to be just cooked—overcooked equals sadness. I often cook it in batches if I’m feeling fancy.
Anecdote:
My son, Leo, loves to help me with this part. He’s enthralled by the sizzling sound as the beef hits the pan—like it’s making music just for us. He’ll lean in and say, “Can I tactic-learn to be a chef?” Dear Lord, children say the funniest things.
Step 5: Add the Vegetables
Practical Instruction:
Once the beef is done, throw in those bell peppers and onions. Stir-fry for another 3-4 minutes till they’re crisp-tender.
The Human Insight:
This combo is perfect; the sweetness of the veg balances the saltiness of the beef. Lovely chemistry, really.
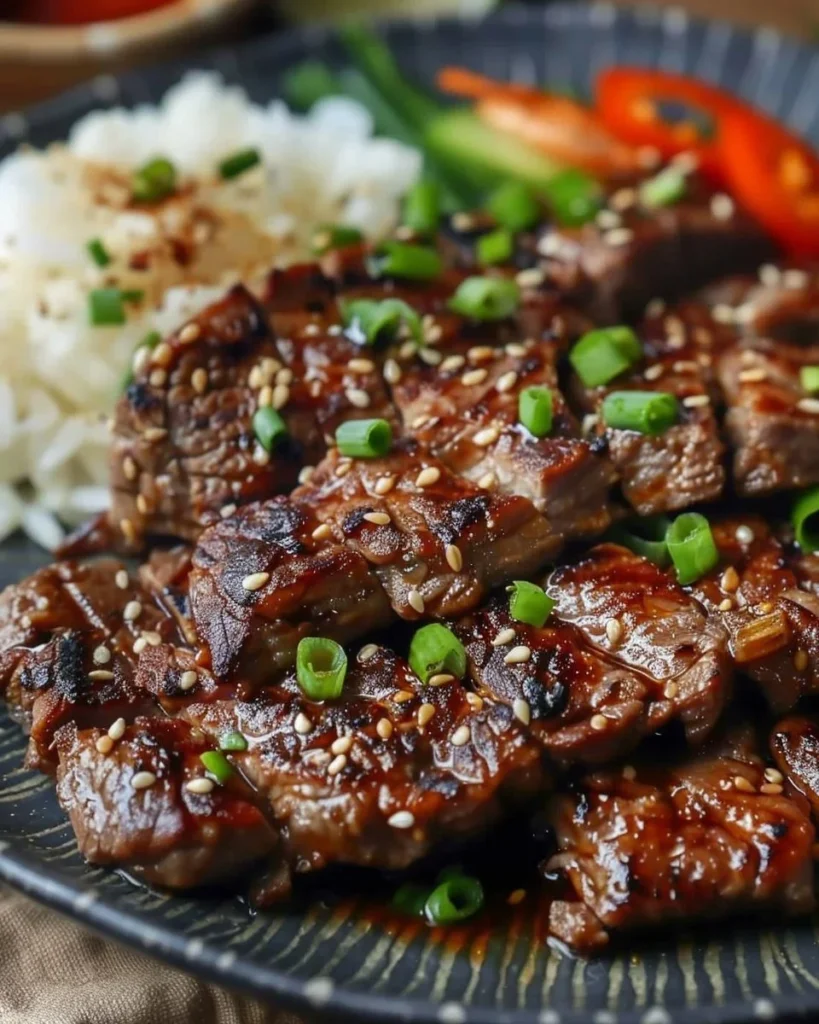
Step 6: Plate and Garnish
Practical Instruction:
Transfer your masterpiece to a serving dish. Sprinkle with green onions and sesame seeds if you’re feeling adventurous.
Common Mistake:
Not letting everyone know we eat with our eyes first. Plate it nicely; it makes a world of difference. All the fam will be diving in before you can even set the table.
Troubleshooting Real Life
- If you burn the meat: Don’t panic! Move it to another pan, dilute it slightly with a bit of water or stock, and hope for the best.
- Out of mirin? A touch of sugar and a splash of apple cider vinegar works well.
- If everything gets too salty: Toss in some diced potato. It absorbs salt like a sponge, and you can just take it out later.
- If it’s just not working: There’s no shame in saying, “Pizza tonight!” We all have our days.
Serving My Yakiniku
I love serving this Beef Yakiniku in large bowls because there’s something about communal dishes that invites everyone to dig in together. And because it’s gorgeous, I talk to myself when plating, pretending I’m on a cooking show. I usually put it on the table with a side of jasmine rice (trust me, it’s like a warm hug in a bowl) and some kimchi as a contrast. Sometimes I even sprinkle a little extra sesame on for flair.
When I Make This
I usually whip this up on a Tuesday night. You know, the day when the weekend feels like ages ago and the energy levels of the family start to fade. Plus, it’s a light workout for me, so bonus! While it cooks, I often fold laundry or sneak in an episode of my latest Netflix binge—yes, I love a good drama with a bit of chaos. Dinner ends up being a family affair at the coffee table, plates piled high, laughter filling the room, and Leo boasting about the “fancy chef meal” he helped make.
The cleanup? Yeah, that sometimes takes longer than cooking, but I’m not mad. This meal has seen me through school projects, late nights, and even that one time I burned toast and felt like a kitchen outcast.
The Conversational Close
This Beef Yakiniku means much more to me than just a meal; it’s an experience. It’s been my feel-good dish, my celebration of friendship, and my weeknight saviour through all kinds of ups and downs. I can’t promise you’ll nail it on the first try (hello, kitchen disasters), but learn from my mistakes, and you’ll get there.
So, what’s your go-to comfort food? Mine changes back and forth, but this one currently holds a special place in my heart—and stomach. And if you give this a shot, I’d love to hear how it goes! Tag me in your cooking adventures, or just enjoy quietly—whatever makes you happy works for me.
If you have any questions, toss them my way! 
FAQ
Can I make this vegetarian? Absolutely! Swap the beef for firm tofu or mushrooms—just adjust the marinade.
What’s a good side dish? I’d say steamed rice or a fresh salad to balance the richness.
Can I prep this meal in advance? Sure! Marinate the beef the night before. Just make sure to cook it fresh.
How do I know when the beef is done? It should be browned but still tender. You can always check with a meat thermometer—medium-rare is usually around 55°C/130°F.

Beef Yakiniku
Ingredients
Method
- In a bowl, combine the soy sauce, mirin, sake, sugar, and sesame oil. Mix well, then add the beef to marinate.
- Slice your bell pepper and onion nice and thin.
- Heat a pan over medium-high heat and add a splash of sesame oil.
- Add the marinated beef to the pan and sear for about 2 minutes on each side.
- Once the beef is done, add the bell peppers and onions. Stir-fry for another 3-4 minutes until they are crisp-tender.
- Transfer to a serving dish. Sprinkle with green onions and sesame seeds if desired.