
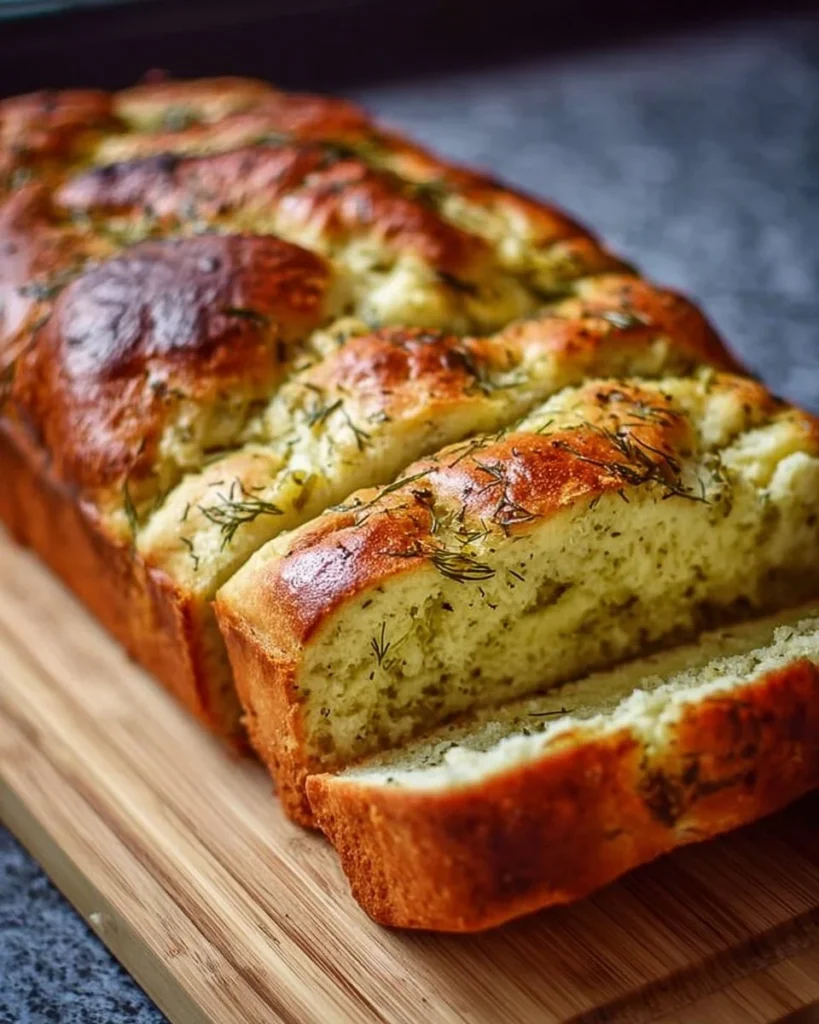
The Dill Pickle Bread Recipe That Got Me Through a Tough Week
The first time I tried to make this Dill Pickle Bread, I may as well have been battling a tornado in the kitchen. Seriously. There I was, knee-deep in flour, accidentally dumping a full jar of dill pickles everywhere (who knew they could explode like that?), and thinking, "Why did I ever think I could bake anything?" My daughter Lily walked in and, after taking one look at my pickle explosion, cracked a smile and said, "Mum, if baking was an Olympic sport, you’d definitely win gold for effort!" That’s the day I learned that cooking is truly about the joyful mess and laughter, not about perfection.
Now, every time I whip up this recipe, I think back to that chaos and remember how far I’ve come. Trust me on this one: there’s something magic about a slice of Dill Pickle Bread, especially when paired with a warm cup of tea or cradling a hearty bowl of soup. Today, this delightful bread is my go-to for when life feels overwhelming. Whether I’m celebrating a small victory or comforting friends during difficult times, it’s always there, bringing warmth and comfort. Let me save you from a pickle debacle of your own.
Why This Matters
This isn’t just any recipe; this Dill Pickle Bread speaks to a part of our lives that needs a hug, especially after a long day. It’s the kind of bread that shouts, “You’ve got this” as you pull it from the oven. It’s perfect for sharing at gatherings—you know, the ones where everyone brings their ‘A’ game and you want to stand out without breaking the bank! And believe me, this bread genuinely impresses.
During the spring, when the sun peeks through after those dreary winters, I find myself whipping this up to share at picnics or gifting loaves to friends—after they’ve had a tough week, of course. Plus, who can resist that satisfying crunch and tang of dill pickles in a warm, soft slice? It’s a little slice of comfort in a chaotic world.
Before You Start
Before you dive into mixing flour and pickles, here are a few nuggets of wisdom I wish I’d known before we embarked on this culinary journey:
-
If you only have plain yogurt instead of buttermilk, don’t fret. Just mix one cup of yogurt with a tablespoon of vinegar, let it sit for five minutes, and voila! Buttermilk alternative!
-
The one tool that makes this infinitely easier: a good ol’ box grater. Shredding your pickles makes them easier to distribute throughout the bread. Plus, it saves me from the pickle-gone-awry situation I faced that fateful day!
-
What to do if your toddler starts melting down at step 3: Keep a bowl of mini pretzels handy—they’re not only a snack but also a distraction for little hands.
-
The exact wine to pour while cooking this: I’d recommend a nice crisp Sauvignon Blanc. Pour yourself a glass while enjoying the aroma of baking bread—trust me, it elevates the entire experience!
Ingredients
Here’s what you’ll need to channel your inner home baker:
- 2 cups all-purpose flour (I use the Tesco value kind since it works just as well for less!)
- 1 teaspoon baking soda (it’s the secret behind that lovely rise)
- 1 teaspoon baking powder (trust me, this makes a difference)
- 1/2 teaspoon salt (I use sea salt like my grandma did—flavour is everything)
- 1/2 cup granulated sugar (because balance, you know?)
- 1 cup pickles, shredded (you can cut them but trust me: shred them for optimal flavour, especially if you’re doing battle-stations with kids involved)
- 1/2 cup dill pickle juice (the liquid gold that binds it all together)
- 1/2 cup buttermilk (best paired with that glass of wine)
- 1/4 cup vegetable oil (I use vegetable; olive oil is lovely, too, but gives a different taste)
- 1 egg (because life needs a bit of binding)
Step-by-Step Instructions
Step 1: Prepping the Oven
Practical Instruction: First, preheat your oven to 350°F (175°C). Don’t skip this step!
Why this step matters: Preheating ensures your bread bakes evenly, giving it that beautiful golden crust.
My personal hack: I keep a sticky note on my oven that says "Preheat before you start mixing!" It saves me every time!
Anecdote: The first time I made this bread, I forgot to preheat. After 40 excruciating minutes of waiting, confused by the smell that never materialised, I opened the oven to find a sad, flat disaster. Lesson learned!
Step 2: Mix the Dry Ingredients
Practical Instruction: In a large bowl, whisk together the flour, baking soda, baking powder, salt, and sugar until well combined.
Common mistake: If you don’t whisk your dry ingredients, you might end up with pockets of unbaked baking soda—that’s definitely not the flavour profile we’re after!
The sensory cue: You’ll know it’s ready when it’s all combined and fluffy-looking.
Step 3: Combining the Wet Ingredients
Practical Instruction: In another bowl, combine the shredded pickles, pickle juice, buttermilk, vegetable oil, and egg. Give it a good stir.
This is where my daughter always wants to help, so now I keep a small bowl of pickles just for her ‘to cook’ with. It keeps her busy and adds a bit of joy to the chaos.
Step 4: Bringing it All Together
Practical Instruction: Add the wet ingredients to the dry ingredients and stir until just combined.
Why this step matters: Overmixing can create tough bread—nobody wants that!
Common mistake here: Resist the urge to keep stirring until it’s perfectly smooth. A few lumps are just fine.
Anecdote: I didn’t realise this until I made a rock-hard loaf, and it all happened because I was trying to channel my inner Mary Berry!
Step 5: Bake It!
Practical Instruction: Pour the batter into a greased loaf pan and bake for 45-50 minutes.
The sensory cue: You’ll know it’s done when a toothpick comes out clean, and it should have that delightful golden colour on top.
Personal quirk: I like to hover by the oven, just waiting for that moment I can smell it baking—it’s my culinary zen moment!
Troubleshooting Real Life
-
If you burn the bottom: Don’t panic! If the top still seems fine, go ahead and serve it. The burnt bits can be trimmed off, or you can embrace the rustic charm!
-
If you’re out of buttermilk: Recall that handy yogurt tip? This is why we shared it! Use it here.
-
If you need to pause because of a kid emergency: Just cover your batter with a clean towel and leave it on the counter; it’ll be safe for at least 20 minutes.
-
If it’s just not working: Sometimes baking is like life—it doesn’t go as planned! If the bread needs more time, just keep an eye on it and adjust.
The Serving Story
I serve this Dill Pickle Bread straight from the pan—there’s something about the first warm slice slathered in butter that is so comforting. Once it’s out and settled, I’ll slice it into thick pieces (and, okay, I might eat the crispy edges straight from the pan before anyone notices).
It pairs beautifully with a lentil soup or a simple salad, and leftovers? Well, they taste even better the next day, soaking up all those flavours. My husband laughs because, no matter how extra I try to elevate it, we often end up slapping a slice into a paper towel and munching on it while we watch television. That’s real home comfort!
When I Make This
I usually make this bread on a quiet Sunday afternoon while Lily practices her violin (which, let’s be honest, is sometimes a bittersweet serenade). While it bakes, I often find myself folding laundry or calling my best mate, Annabelle, to catch up. We both lean into the chaos of life, and sharing a warm loaf over a cuppa somehow makes everything feel manageable again.
The cleanup takes only about 15 minutes but is worth it every single time because, come on, who can resist that homemade aroma wafting through the house?
The Conversational Close
This Dill Pickle Bread recipe has seen me through challenging days, family gatherings, and “why is no one coming to visit?” moments. It might not be flawless, but it’s mine—flavorful, tangy, and a tad on the messy side (just how I like it).
I’d love to hear if you make it—tag me in your culinary adventures or just savour it quietly and know that I’m cheering you on from my kitchen! What’s your go-to comfort food? Mine changes with the seasons, but right now, it’s definitely this warm loaf of Dill Pickle Bread.
Tell me what you think if you make it; your feedback means the world! Happy baking!
Dill Pickle Bread
Ingredients
Method
- Preheat your oven to 350°F (175°C).
- In a large bowl, whisk together the flour, baking soda, baking powder, salt, and sugar until well combined.
- In another bowl, combine the shredded pickles, pickle juice, buttermilk, vegetable oil, and egg. Stir well.
- Add the wet ingredients to the dry ingredients and stir until just combined.
- Pour the batter into a greased loaf pan.
- Bake for 45-50 minutes, or until a toothpick comes out clean and the top is golden.