The Only Homemade Nutter Butter Cookies You’ll Ever Want to Make
The first time I tried to make these little gems, let’s just say it went south faster than you can say “peanut butter.” I was around 29 years old, in my tiny flat, and thought I had this cookie-making thing figured out. Spoiler alert: I didn’t. I had flour on the walls, peanut butter in my hair, and a pan full of what I can only describe as cookie mush. You know, the type of disaster that makes you question your life choices? It was then that my cousin Lisa walked in, took one look at my epic fail, and said, “At least your heart’s in the right place, kid.” Yeah, thanks for that, Lisa.
That was over fifteen years ago, and after many batches, some lower lows, and a few unbelievably high highs (yay for Pinterest!), I finally cracked the code to these homemade Nutter Butter cookies. Now, every time I make them, I’m reminded of that kitchen disaster. And I do so with a smirk, knowing I turned that mess into something that’s not only edible, but downright delicious. Also, they’re what I whip out for a quick pick-me-up during the stormy winter months. Seriously, who doesn’t want a nutty, buttery hug in cookie form during the dreariest time of year?
Why This Matters
Here’s the thing: Nutter Butter cookies aren’t just a snack. They’re a remedy for the soul—like a warm blanket on a cold day. When everything feels overwhelming, there’s something magical about taking a few moments in the kitchen to indulge in childhood memories and comfort. It’s not just cookies; it’s a solution when you need an escape or a treat for a friend in need. Life can be chaotic, and sometimes I just need a little peanut butter magic to keep me grounded. So trust me on this—keep this recipe handy for those times when you want to impress your loved ones, or when life feels a bit too much to handle.
Before You Start
- Peanut Butter Mischief: If you only have crunchy peanut butter instead of creamy, you might just end up with delightful little textures in your cookies. Don’t sweat it; it adds character!
- Tools You Didn’t Know You Needed: Go grab a fork; yes, a plain old fork. It’s going to be your best friend when you’re crafting those delightful crosshatch patterns. Also, it doubles as a “taste testing spoon” so you can sneak a few bites along the way.
- Kid Situation: If your kids start going a bit haywire in the middle of this process, hand them an ungreased baking sheet and let them “create” their masterpieces. It’s a brilliant distraction and keeps them out of your hair (hopefully).
- A Sip for the Soul: Now, I’m going to suggest a cup of tea (Earl Grey if you’re fancy, which I pretend to be sometimes) while you make these. Just trust me—you’ll thank me later.
Ingredients List with Personal Notes
- 1 cup unsalted butter, softened (I let mine sit out for a good hour. Trust me, you don’t want rock-hard butter ruining this joyous occasion.)
- 1 cup granulated sugar (My friend Sarah always says, “A little extra sugar never hurt anyone,” and she might have a point there.)
- 1 cup packed brown sugar (Here’s a pro tip: the darker the brown sugar, the richer the flavour. It’s like a cheat code for desserts.)
- 1 cup peanut butter (I use the brand “Skippy” because my dad always called it the “king of peanut butter.” Can’t argue with family traditions.)
- 1 large egg (Room temperature, so it blends well—nobody wants a lumpy cookie dough.)
- 1 teaspoon vanilla extract (Go for pure vanilla if you can’t stand fake stuff; the difference is real.)
- 2 cups all-purpose flour (Yes, you need this much. No, it’s not going to be flour overload. Just trust the process.)
- 1 teaspoon baking powder (The secret nobody tells you: this is what gives your cookies that nice little boost.)
- 1/2 teaspoon baking soda (Same idea. Think of it like a pep talk for your cookies.)
- 1/2 teaspoon salt (Always add salt! It brings everything together, making it taste divine.)
- Chocolate chips (optional) (Sometimes I just toss a handful in because…well, why not? Chocolate is life.)
Step-by-Step with Stories
1. Start by Preheating Your Oven:
Preheat your oven to 350°F (175°C).
Why this step matters: You want that oven to be hot and ready to give your cookies some love when they finally land on the tray.
Common mistake here: Forgetting to preheat your oven. I’ve done that before and it’s like trying to catch a train that’s already left the station. No bueno.
My personal hack: I usually set my kettle to boil as a gentle reminder—if I hear that kettle whistle, it’s time to check the oven!
The sensory cue: You’ll know your oven is ready when you hear that lovely little “ding”—that’s the sound of cookie dreams coming true.
2. Mixing the Butters and Sugars:
In a big bowl, cream together the butter, granulated sugar, brown sugar, and peanut butter until well combined.
Why this matters: Creaming traps air, which means fluffier cookies.
Common mistake here: Not beating enough. I used to quit too early, thinking, “Eh, good enough.” Spoiler alert: it wasn’t.
My human insight: If it looks like a fluffy cloud, you’re golden. But if it’s just mushing together, keep going!
Little story: This is the stage where I usually have a small dance party because peanut butter and sugar make me inexplicably happy. I’ve often caught my husband peeking around the corner, laughing at my two-minute dance sessions. It’s just that good.
3. Beat in the Egg and Vanilla:
Now, add in the egg and vanilla extract. Beat until thoroughly mixed.
Why this step matters: They’re the magical binders that pull everything together, much like the family gatherings I never want to end.
My kitchen hack: Crack your egg into a separate bowl first before adding it in—it’s a good way to avoid any shell surprises.
The sensory cue: You’ll know it’s ready when the mixture looks smooth and creamy. You might be tempted to taste it—go on, I won’t tell anyone.
4. Combine the Dry Ingredients:
In a separate bowl, whisk together the flour, baking powder, baking soda, and salt until blended.
Why this matters: Mixing the dry ingredients ahead helps avoid flour lumps in your dough. Plus, there’s something satisfying about the bowl of white powder.
Common mistake here: Not whisking enough. Don’t be lazy; lumps aren’t cute.
Personal note: This is usually when my son, Oliver, bursts in asking for cookie dough. I’ll save a spoonful every time—it’s like the family tradition of licking the spoon but with a twist.
5. Gradually Add Dry Ingredients to Wet:
Now stir the dry mix into the wet mixture. I usually do this in thirds; it’s much easier that way.
Why this step matters: You avoid overmixing, which can make the cookies tough. Nobody wants to bite into a hockey puck.
Common mistake: Overmixing out of excitement. I once ended up with cookies so tough my husband jokingly said they could double as paperweights.
Anecdote: I remember one time adding the flour too quickly and the entire bowl looked like it was in an explosion. Flour was everywhere—my clothes, my hair. My daughter, Sophie, still asks me if I’m going to make a “flour storm,” and honestly, I think I’ve created a legendary cooking moment.
6. Optional: Fold in Chocolate Chips:
If you’re feeling risky (or indulgent), now’s the time to fold in chocolate chips.
My personal hack: I usually use semi-sweet chocolate because it balances the sweetness of the cookies—but hey, if you want to drop in some dark chocolate chunks, go for it!
A funny story: I once had an entire bag of chips go rogue and jump into the batter. No complaints here, though!
7. Scoop and Shape:
Scoop out tablespoonfuls of dough and shape them into rounded balls. Place them on a cookie sheet lined with parchment paper, spacing them apart.
Why this matters: If they’re too close, they’ll merge into one mega cookie, and while a mega cookie sounds tempting, you’ll regret it when you try to break off a piece.
The sensory cue: You’ll know it’s the right time for scoopage when the dough looks nice and thick, not gloopy—take a moment to appreciate that velvety peanut butter goodness before you proceed.
Little note: My husband, Dan, usually tries to sneak a piece of dough during this stage—it’s become a funny tradition, one I don’t mind helping him with, obviously.
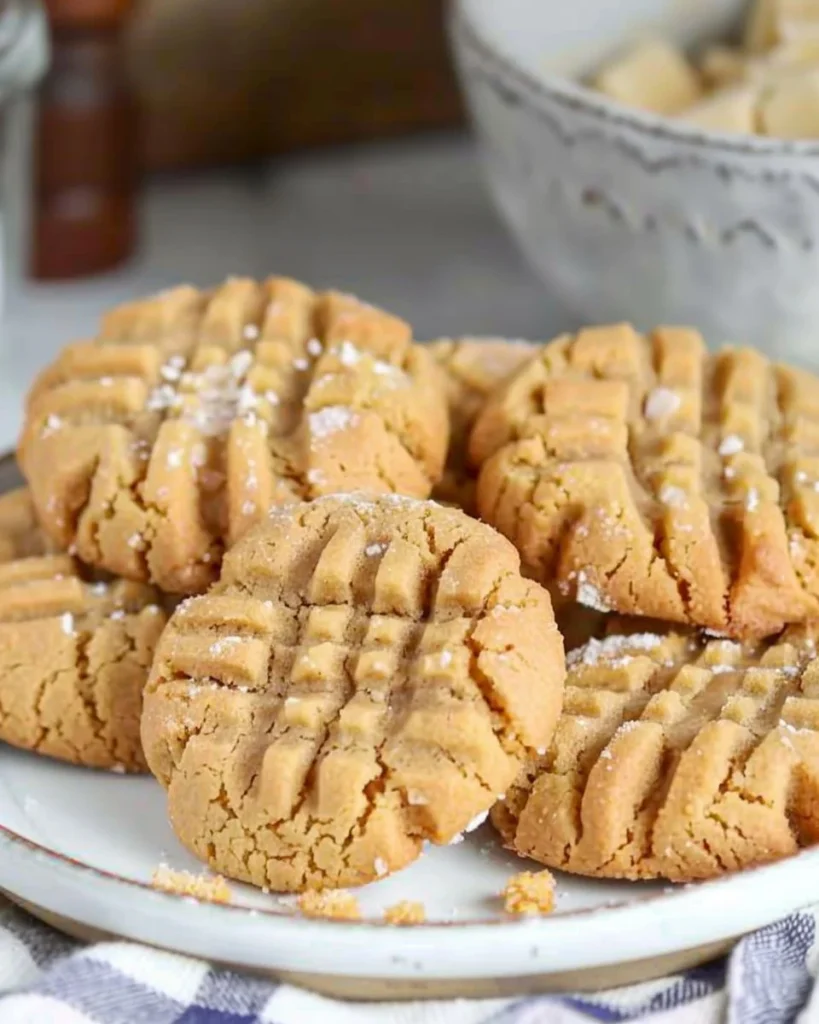
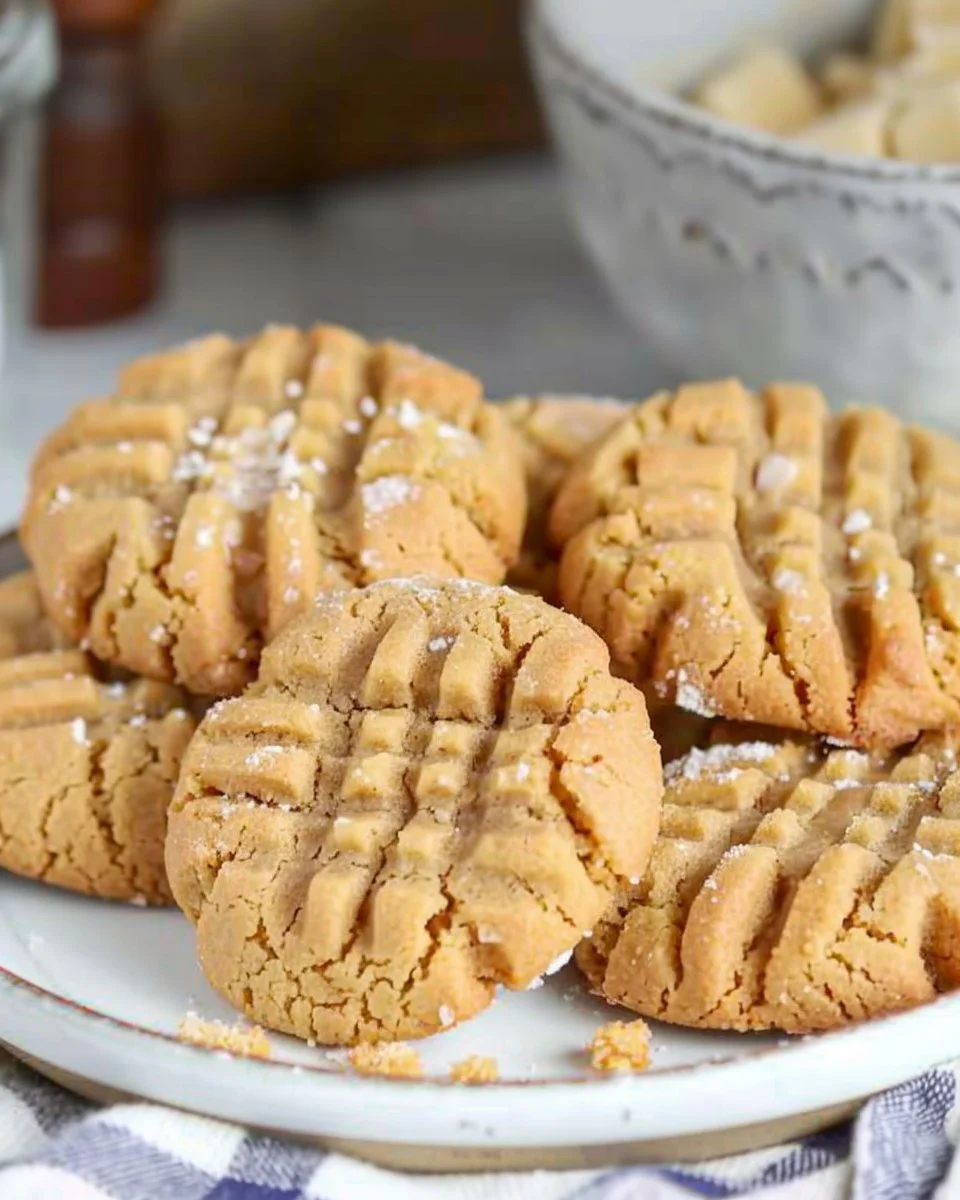
8. Fork Crosshatch Designs:
Now, here’s the fun part: take a fork and gently press it into the top of each dough ball to create that iconic crosshatch design.
Common mistake: Pressing too hard! It’s a gentle touch—like a sweet embrace rather than a wrestling match. We’re making cookies, not flattening a pancake.
Story time: The first time I made these cookies, I didn’t realize you were meant to press gently, so they looked like little Frisbees. Lesson learned.
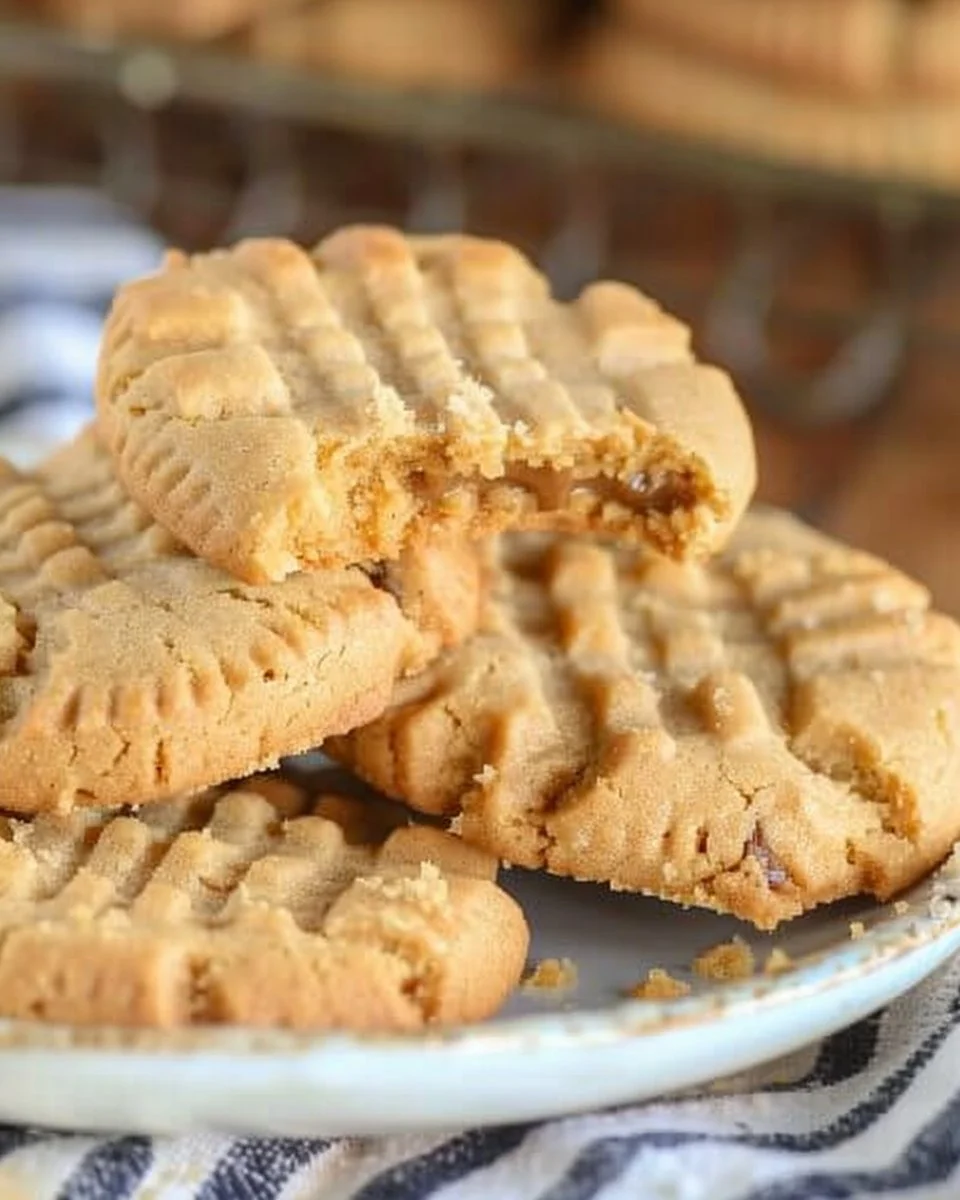
9. Bake:
Pop those bad boys in the oven for about 10-12 minutes until they’re golden but not overbaked.
Why this step matters: You want them to be soft in the center for the ultimate chewy experience.
Common mistake: Forgetting about them and then they turn into little peanut butter bricks. Learn from my mistakes!
Funny moment: My son has a semi-annual “cookie watch” break where he announces loudly every time the oven dings. It’s the one time we all gather in the kitchen to fight over who gets the first warm cookie.
10. Cooling Time:
Let the cookies cool on the sheet for five minutes before transferring them to a wire rack to cool completely.
Why this matters: They need time to set and firm up. It’s tough, I know, but you can do it.
The sensory cue: When you smell that toasty nutty aroma wafting through your home, you’ll know they’re ready to adorn your kitchen.
Personal note: During this time, I often enjoy a cup of tea, both to calm my excitement and to give myself a breather before the inevitable cookie frenzy begins.
Troubleshooting Real Life
-
If you burn the bottom: Well, the best salvage method is to scrape off the burnt bits. Not glamorous, but it works. Just don’t let anyone see—you’ll be the secret cookie chef.
-
If you’re out of an ingredient… Just swap. Running low on flour? Use almond flour instead! Trust me; your cookies will still taste fantastic.
-
Kid emergency avoidance tactics: If the little ones come running in crying over a lost toy, pause baking and set a timer for five minutes—it’s amazing what five minutes can do to calm a child (and give you a moment to plan your escape if needed).
-
If it’s just not working: The world won’t end. If your dough seems off, just roll it into balls and make cookie dough bites instead. Or, if it’s really not working, allow yourself to order takeout and be free of cookie guilt.
The Serving Story
I serve these cookies in a giant mixing bowl because, well, I can’t be bothered with fancy servers and let’s be honest—everyone digs the family-style approach. We usually have them after dinner while binge-watching our latest Netflix obsession.
As for sides? I’ll sometimes whip up a batch of homemade whipped cream to dip the cookies into. It’s just a bit of decadent indulgence that never hurts.
And leftovers? Well, that’s a bit tricky because there aren’t usually any left. But if there are, I find they taste even better the next day after a little time hanging out in an airtight container. It’s like the flavors marry overnight. Yum.
When I Make This
I usually make these cookies on chilly Sunday afternoons when the world outside is drizzly and gray. Afternoons like that scream for warmth, and let’s be honest—cookies soothe the soul like that.
While they bake, I’ll often fold laundry or sneak an episode of my favorite show (cue guilty grins). We eat them at the kitchen table with a homemade pot of tea, and I’ll always leave a few cookies for anyone who walks through the door, whether it’s friends who drop by or a lost neighbor looking for some cozy chats.
Cleanup takes about ten minutes, but that’s fine—the joy that these cookies bring makes it worth every second.
The Conversational Close
This recipe has seen me through late-night cravings, birthday parties, and even last-minute gifts for that neighbor who loaned you a cup of sugar three weeks ago (no judgment, we all know the drill). It may not be perfect, but it feels like my culinary treasure.
So, I’d love to hear if you make them—experiment all you want, see what works for you. And what’s your go-to comfort food? Mine’s evolving, but homemade Nutter Butter cookies are definitely at the top of the list right now.
Happy baking, my friends! And may your peanut butter adventures be delicious!

Homemade Nutter Butter Cookies
Ingredients
Method
- Preheat your oven to 350°F (175°C).
- In a big bowl, cream together the butter, granulated sugar, brown sugar, and peanut butter until well combined.
- Add in the egg and vanilla extract and beat until thoroughly mixed.
- In a separate bowl, whisk together the flour, baking powder, baking soda, and salt.
- Gradually stir the dry mix into the wet mixture in thirds to avoid overmixing.
- If desired, fold in chocolate chips.
- Scoop out tablespoonfuls of dough and shape them into rounded balls, placing them on a cookie sheet lined with parchment paper.
- Gently press a fork into the top of each dough ball to create a crosshatch design.
- Bake cookies for about 10-12 minutes until they’re golden but not overbaked.
- Let cookies cool on the sheet for five minutes before transferring them to a wire rack to cool completely.